
Home / PGP Encryption Guide

PGP Encryption Guide

PGP (Pretty Good Privacy) is the cryptographic standard that lets people encrypt text for a recipient and sign text so others can check who signed it. The practical tool used here is GnuPG. You will create a key, protect and back it up, exchange public keys, encrypt a message, and verify a signature without treating cryptography as magic.

What Is PGP Encryption and Why It Matters

Phil Zimmermann released Pretty Good Privacy in 1991. Today, people often say “PGP” when they mean the OpenPGP standard or software that implements it. GnuPG is the open-source implementation used in this article. Its central idea is public-key cryptography: two people can exchange protected messages without first sharing one secret password.

The system works through asymmetric key pairs. Each user generates two mathematically linked keys: a public key (which can be freely shared) and a private key (which must never leave the owner's possession). Messages encrypted with someone's public key can only be decrypted with their private key. Conversely, messages signed with a private key can be verified by anyone holding the corresponding public key. This dual functionality — encryption for confidentiality and signing for authenticity — makes PGP the backbone of trust on the dark web.

On darknet platforms, PGP is commonly used in three ways. First, it encrypts buyer-vendor communications so that even if a marketplace database is breached, message contents remain unreadable. Second, it provides two-factor authentication — during login, users decrypt a PGP-encrypted challenge message to prove possession of their private key. Third, it verifies the authenticity of market announcements, mirror links, and vendor identities through cryptographic signatures that cannot be forged without access to the signer's private key.

The open-source implementation of PGP is called GnuPG (GNU Privacy Guard, or GPG). When this guide references "PGP" it refers to the protocol and concept; when it references "GPG" or "GnuPG" it refers to the specific software you'll install and use.
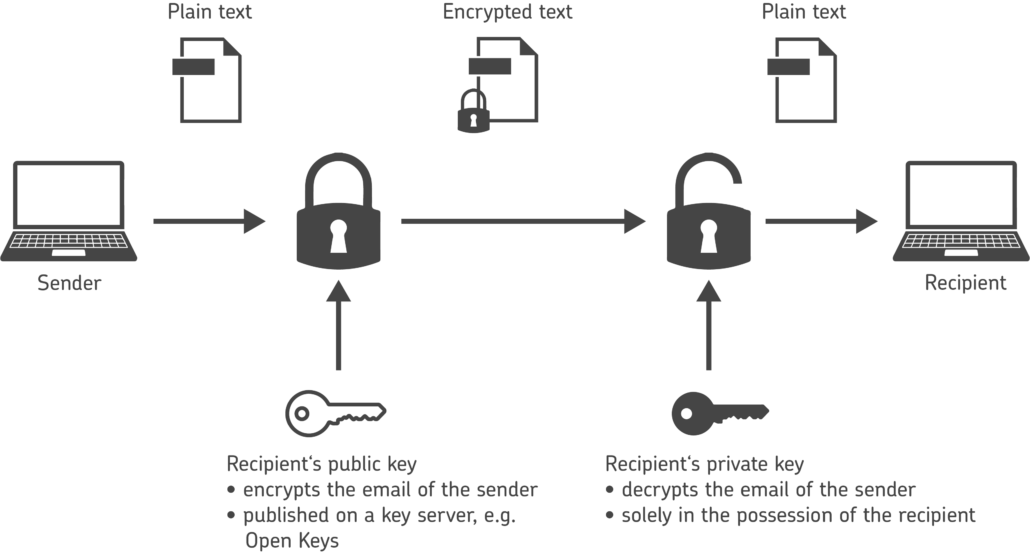
Diagram showing PGP public key and private key encryption flow between sender and recipient
PGP uses asymmetric key pairs — the public key encrypts, and only the corresponding private key can decrypt.

Installing GnuPG — Software Setup by Platform

GnuPG is available for every major operating system. The installation process differs by platform, but the resulting functionality is identical — you'll have access to the same gpg command-line tool and key management system regardless of your OS.

Windows — Gpg4win
Download Gpg4win from gpg4win.org — the official GnuPG distribution for Windows. The installer includes GnuPG itself, Kleopatra (a graphical key management interface), and GpgOL/GpgEX plugins for Outlook and Windows Explorer integration. For dark web usage, you primarily need GnuPG and Kleopatra. Run the installer with default settings — no administrator privileges are required. After installation, open a PowerShell terminal and type gpg --version to confirm the installation. You should see version 2.4 or newer.
macOS — GPG Suite or Homebrew
The simplest option is GPG Suite from gpgtools.org, which provides a native macOS interface including GPG Keychain for key management. Alternatively, install GnuPG through Homebrew with brew install gnupg. The Homebrew method gives you CLI-only access without a graphical interface, which is sufficient for all operations covered in this guide. Verify installation with gpg --version in Terminal.
Linux — Package Manager
Most Linux distributions include GnuPG pre-installed. If not, install it through your package manager: sudo apt install gnupg (Debian/Ubuntu), sudo dnf install gnupg2 (Fedora), or sudo pacman -S gnupg (Arch). For users running Tails or Whonix — the recommended operating systems for dark web activity — GnuPG is already installed and configured with security-hardened defaults. Verify with gpg --version.
Tails OS
Tails includes GnuPG and the Kleopatra graphical key manager. Keys disappear at shutdown unless the GnuPG feature is enabled in encrypted Persistent Storage. For regular use, enable that feature deliberately and store your key pair there keeps the keys in encrypted Persistent Storage on the USB drive rather than on the host computer. This can reduce local traces, but the key is still exposed while it is unlocked and in use.

Generating Your PGP Key Pair — Step by Step

Your PGP key pair is the foundation of your cryptographic identity. The public key is what you share with platforms and individuals; the private key is what proves you are who you claim to be. Generating a strong key pair carefully matters because later backups, signatures, and encrypted messages all depend on it.

  1. Open your terminal or command prompt. On Windows, open PowerShell. On macOS, open Terminal. On Linux or Tails, open your preferred terminal emulator. All GnuPG operations use the gpg command-line interface. Graphical tools like Kleopatra wrap the same commands in a GUI, but understanding the CLI gives you more control and troubleshooting ability.
  2. Run the key generation command. Type gpg --full-generate-key and press Enter. GnuPG will prompt you through a series of questions. Current versions offer modern defaults and may show different menu numbers, so choose by algorithm name rather than copying a number from an old tutorial. The default is a sensible choice for most beginners. RSA remains useful where compatibility with older systems matters; Ed25519 signing with a Curve25519 encryption subkey is a compact modern option. No present-day algorithm should be described as “future-proof.”
  3. Set the key expiration. GnuPG asks how long the key should be valid. A one- or two-year period creates a useful reminder to review the key, and 1y sets one year. Expiry is not a cure for compromise: someone who controls the secret primary key may be able to extend it. Revoke a compromised key instead.
  4. Enter your identity information. GnuPG requests a name and email address. For dark web usage, do not use your real name or email. Use your marketplace username or a pseudonym as the name, and either leave the email blank or use a disposable address. This information is embedded in the public key and visible to anyone who imports it. Enter a comment field if desired — many users put the platform name (e.g., "darknet market key").
  5. Set a strong passphrase. The passphrase protects your private key at rest. Even if someone copies your private key file, they cannot use it without the passphrase. Use a long, unique passphrase generated and stored with a method you trust. Length and unpredictability matter more than forcing a predictable mix of symbols. Do not reuse a password from another account.
  6. Verify your new key. After generation completes, run gpg --list-keys to see your new key pair. The output displays the key ID, creation date, expiration date, and the identity you entered. Use gpg --fingerprint your-identity to display the complete fingerprint others should verify. Also run gpg --list-secret-keys to confirm the private key is stored locally.
⚠ Critical Security Rule

Your private key and passphrase are the only things that prove your identity. If you lose the private key, you permanently lose access to any account secured by PGP 2FA. If someone else obtains your private key and passphrase, they can impersonate you, read your encrypted messages, and take over your accounts. Back up your private key to an encrypted USB drive stored in a physically secure location.

Exporting and Sharing Your Public Key

Your public key needs to be uploaded to darknet platforms for encrypted communication and 2FA setup. The standard format for sharing PGP public keys is ASCII armor — a base64-encoded text block that can be copied and pasted into web forms.

To export your public key in ASCII armor format, run: gpg --armor --export FULL-FINGERPRINT. Replace the placeholder with the complete fingerprint of your key. The output is a text block starting with -----BEGIN PGP PUBLIC KEY BLOCK----- and ending with -----END PGP PUBLIC KEY BLOCK-----. Copy this entire block, including the header and footer lines.

You can also export to a file: gpg --armor --export FULL-FINGERPRINT > my-public-key.asc. This creates a text file that you can upload directly to platforms that accept file uploads for PGP key registration.

Important: Public vs Private

Only export and share your public key. The command --export outputs the public key by default. The command --export-secret-keys exports the private key — never run this command unless you are creating a backup, and never paste the output into any web form or send it to anyone.

Encrypting and Decrypting Messages

Encrypting a Message for Someone Else

To encrypt a message, you need the recipient's public key. On darknet platforms, vendors typically publish their public key on their profile page. Copy the entire key block, save it to a file (e.g., vendor-key.asc), and import it with: gpg --import vendor-key.asc. GnuPG confirms the import and displays the key's fingerprint.

Compare the imported key's complete fingerprint with one obtained through an independent, trusted channel. Then write the message in a protected file and encrypt it with: gpg --armor --encrypt --recipient FULL-FINGERPRINT message.txt. This creates message.txt.asc containing the encrypted content. Putting sensitive text directly in a shell command can leave it in terminal history, so avoid examples built around echo "secret".

Decrypting a Message Sent to You

When someone sends you a PGP-encrypted message, save the entire encrypted block (including headers) to a file, then run: gpg --decrypt message.asc. GnuPG prompts for your passphrase, decrypts the message using your private key, and outputs the plaintext. If decryption fails with "no secret key," the message was encrypted for a different public key — either the sender used the wrong key or you're on a different machine without the correct private key.

Encrypting for Multiple Recipients

You can encrypt a single message for multiple recipients by specifying multiple --recipient flags: gpg --armor --encrypt --recipient FINGERPRINT1 --recipient FINGERPRINT2 message.txt. Each recipient can independently decrypt the message with their own private key. This is useful when communicating with both a vendor and a marketplace moderator during a dispute.

Signing Your Own Text or File

Use gpg --clearsign message.txt when readers need to see the text and signature together. For a separate signature file, run gpg --armor --detach-sign document.pdf. A recipient verifies that pair with gpg --verify document.pdf.asc document.pdf. Signing proves control of the secret signing key; recipients still need to verify the public-key fingerprint before connecting the signature to your identity.

Verifying Signatures

A valid PGP signature shows the signed material has not changed and was signed by a particular key. Connecting that key to a real person or project still requires checking the full fingerprint through an independent channel — not an optional extra.

Signing is separate from encryption: verification uses only the signer's public key. For step-by-step GnuPG commands, Tor Browser installer examples, and reading Good or BAD output, use the PGP signature verification guide.

Setting Up PGP-Based Two-Factor Authentication

PGP challenge-response adds a factor that is separate from the account password. It can prevent a password-only takeover, but its strength depends on the private key, the endpoint used to decrypt challenges, and the platform's implementation. It should not be ranked categorically against TOTP or hardware-backed authentication without that context.

How PGP 2FA Works

During login, after entering your username and password, the platform generates a random challenge string, encrypts it with your public key, and displays the encrypted message. You copy this encrypted block into your terminal, decrypt it with gpg --decrypt, and enter the revealed plaintext string into the login form. Because only your private key can decrypt the challenge, this proves you are the legitimate account holder even if an attacker knows your password.

Setup Process

  1. Navigate to your account security settings. Most darknet markets have a dedicated section in your profile for PGP key management and 2FA configuration.
  2. Paste your ASCII-armored public key. Copy the output of gpg --armor --export your-username and paste it into the platform's PGP key field. Submit the form.
  3. Complete the verification challenge. The platform encrypts a test message with your public key. Copy the encrypted text, decrypt it locally with gpg --decrypt, and enter the decrypted string to prove you hold the private key.
  4. Enable PGP 2FA in your security settings. After successful key verification, toggle the 2FA option to "Enabled" or "Required." From this point, every login will require PGP decryption in addition to your password.
Practical Tip

For faster 2FA at login, use a clipboard-aware workflow: copy the encrypted challenge from the browser, paste it directly into your terminal with gpg --decrypt, copy the decrypted result, and paste it back into the login form. On Tails with Kleopatra, you can use the clipboard encryption/decryption feature for one-click operations.

PGP Key Management — Backups, Expiry and Revocation

Generating a key takes minutes. Keeping it usable without exposing or losing it is the part that requires steady habits over months and years.

  • Back up your private key to an encrypted USB drive stored in a physically secure location — do not rely solely on your computer's hard drive
  • Use a unique, strong passphrase for your PGP key — never reuse a password from any other service or account
  • Set a manageable expiration date and review it before it arrives — expiration is a reminder to reassess a key, not proof that a compromised key became safe
  • Generate separate key pairs for separate identities — never use the same PGP key across different pseudonyms or platforms where identity separation matters
  • Verify the complete fingerprint shown by your current GnuPG version rather than relying on a short key ID or assuming every fingerprint has one fixed length
  • Never upload your private key to a website or online form
  • If your private key is compromised, publish its revocation certificate, generate a new key, and confirm the replacement to contacts through an independent trusted channel
  • Back up the automatically generated revocation certificate from openpgp-revocs.d separately — anyone with that certificate can revoke the key, so protect it from both loss and unauthorized access

GnuPG 2.1 and later creates a revocation certificate when a new key is generated. Back it up before you need it. If the private key is lost or compromised, import that certificate and distribute the revoked public key so correspondents can learn that it should no longer be used. The GnuPG configuration manual explains where these files live, while the key-management manual documents expiry and revocation commands.

PGP Software Comparison — Choosing the Right Tool

Tool Platform Interface Best For
Gpg4win + Kleopatra Windows GUI + CLI Windows users who want a visual key manager with full CLI access
GPG Suite macOS GUI + CLI macOS users who prefer native integration with Apple Mail and Finder
GnuPG (CLI only) All platforms CLI Advanced users comfortable with terminal commands — maximum flexibility
Seahorse Linux (GNOME) GUI Linux desktop users who prefer a graphical interface for key management
OpenKeychain Android GUI Mobile PGP operations — limited but functional for basic encrypt/decrypt

Kleopatra and the gpg command use the same GnuPG installation, so keys created in one appear in the other. OpenKeychain and some other apps are independent OpenPGP implementations. They can usually exchange compatible keys and messages, but algorithm and format support can differ. Check compatibility before depending on a cross-platform workflow.

For a deeper understanding of how PGP 2FA functions on active darknet platforms, see the platform security overview which demonstrates how PGP encryption integrates with login flows and identity verification systems.